How to Hang Lights on Deck Railing: 5 Easy Methods
You’ll transform your deck railing into an illuminated focal point by combining five straightforward methods. Start by planning your layout and measuring your deck precisely. Install post cap lights by routing low-voltage wiring through post cavities. Add undermount LED railing lights using adhesive-backed channels positioned 1½ inches from edges. Run wiring beneath decking for aesthetic appeal, then secure your low-voltage transformer at least 12 inches above ground near a GFCI outlet. The specifics of each installation method will reveal how you can achieve both safety and stunning visual appeal.
Planning Your Lighting Layout
How do you know where to start when you’re ready to hang lights on your deck railing? Begin by taking precise deck measurements—length, width, and height—to calculate your lighting needs accurately. Next, establish your lighting goals: do you want ambiance, safety illumination, or architectural highlighting? Identify functional zones like dining areas, walkways, and seating spots that need specific lighting types. Sketch your deck layout, marking posts, railings, stairs, and existing electrical access points. This visual plan guides your fixture placement decisions. Consider your deck’s size to determine lighting density; larger decks require more fixtures or stronger lights. Finally, plan layered lighting combining ambient, task, and accent types for a cohesive scheme that balances comfort with usability and safety. Popular mounting methods like deck screws and cup hooks can secure your lights directly to railing structures for a clean, professional appearance. Ensure all electrical components and wiring are properly protected and installed in well-ventilated areas to maintain safety and prevent hazards.
Installing Post Cap Lights
Installing post cap lights requires meticulous preparation and a systematic approach to guarantee your deck’s lighting functions safely and looks polished. You’ll begin by routing low-voltage wiring through post cavities using a router with a 3/4″ bit for top rails, then drill holes strategically to pull wires horizontally through posts. Leave approximately 6 inches of lead wire at each fixture location for adequate connection slack. Before finalizing post cap placement, verify your transformer’s green indicator light illuminates. Select your preferred lighting types—halogen or LED—and connect wires using male and female connector pairs, twisting three wires together for positive connections. Maintain proper wire spacing between lights to allow joining cables to run safely under joists without pinching. For a polished final appearance, ensure your deck railing complements your hidden fastener installation methods to maintain a seamless, professional look throughout your deck structure. Finally, apply exterior-grade construction adhesive to the cap’s underside, press it firmly onto the post, and secure your faceplate once all electrical connections are verified working properly.

This set of 6 post lights is designed for 4x4 Vinyl / Wooden Posts. If your post size does not fit, please check the Bundles with this item section above to find a compatible option for your posts.

High-performance solar lights – stays lit for up to 12 hours
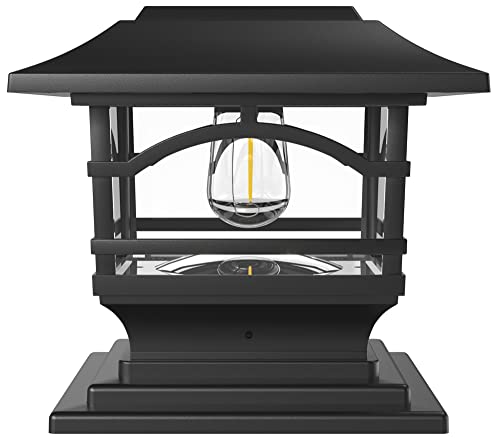
SOLAR POWERED - Save energy, save money, save the planet. Caps charge during the day and turn on automatically at night. 8 hours of battery life each night.
Installing Undermount LED Railing Lights
Transform your deck railing with undermount LED lights that create an elegant, hidden lighting effect without visible fixtures cluttering the surface. Start by inspecting and cleaning the railing’s underside thoroughly with alcohol wipes to remove dust and grease, guaranteeing peak adhesion.
Install your mounting techniques using screws or adhesive-backed channels, positioning them 1½ inches from the edge. Apply your LED strip carefully into the channel, pressing every ½ inch to avoid air bubbles and guarantee straight alignment.
Conceal all wiring by tucking excess cables behind the railing or into post holes. Use silicone caulk to seal the LED strip’s cut end for waterproof protection. For additional wire protection and organization, consider using adhesive cable runners to keep your installation looking neat and professional.
Finally, center the LED strip in the channel and test all lights before completing installation. Your undermount LED strip now delivers sophisticated ambiance while remaining completely hidden from view.

Brilliant Illumination- Illuminate your space with an impressive 1380 lumens of 3000K radiant warm white light, perfect for enhancing visibility and creating a cozy ambiance while only using 18 watts of energy. Non-Dimmable.

Product upgrade - Muzata has optimised the internal structure of original LED handrail to make it more stable, while having a larger LED channel for a better visual effect. In addition, we have included accessories like handrail extension connector and end cap in the package to avoid mismatches and make the installation more convenient for you

【Ultra Bright Under Cabinet Light】Compared with low-voltage LED strips, AC 110V-130V cabinet light strips use advanced high-voltage AC technology to provide higher brightness and more uniform lighting effects, completely eliminating dark areas and creating a bright and comfortable spatial atmosphere. In addition, it can be directly connected to AC 110V-120V household power supply, plug and play. During use, there is no voltage drop and the brightness remains consistent from start to finish.
Running Wiring and Making Connections
Because proper wiring concealment protects your installation from damage and maintains your deck’s aesthetic appeal, you’ll need to route low-voltage cables beneath the decking structure rather than across its surface. Plan your wire routing before construction begins, avoiding joists and headers while maintaining six inches of slack at each hole for connection flexibility.
Secure cables using insulated staples at two-foot intervals along support structures. Use connector types appropriate for your fixtures: silicone-filled wire nuts for post cap lights, brass barrel connectors with shrink tube for LED strips. Twist connectors firmly with pliers to guarantee secure fastening and proper polarity.
Test all connections before final assembly, activating your full circuit to verify functionality and identify loose joints. This verification prevents dimming issues and confirms weatherproof sealing.

BEFORE YOU BUY: 100 Pack of Premium PVC insulated staples for electrical wire protect against heat and wear. These electric staples provide safe circuit protection for lasting performance.

Sufficient Insulated Staple Set: you will get 200 pcs 1/8 Inch white small staples, which can meet your needs for accommodating numerous cables, making it a convenient solution for securing wires and cables

READY FOR ACTION: The T59 is a great choice for installing data and communication cables; This staple is perfect for installing computer, CAT5 / CAT6, RG6 / RG9, COAX, and phone cables without crimping
Installing the Transformer and Testing Your System
Your low-voltage transformer serves as the heart of your deck lighting system, so you’ll need to position and connect it carefully to guarantee safe, reliable operation. Mount the transformer at least 12 inches above ground on an exterior wall, using stainless steel screws for secure attachment. Plug it into a nearby GFCI outlet within reach for safety compliance.
For transformer installation, remove the bottom knockout and insert the terminal adapter. Connect low-voltage wires to correct polarity terminals using weatherproof wire nuts. Tighten all screws firmly to prevent loose connections.
During system testing, inspect all wiring before powering on. Plug the transformer in and test each light for proper operation and brightness. Check for flickering or non-functioning lights, then verify photocell and timer functions if installed. Ensure your deck has adequate drying time after any recent cleaning before powering on the system to prevent moisture-related electrical issues.

Low-Voltage Transformer with Photocell Sensor: The 300W ETL-certified low voltage transformer converts 120V AC to a safe 12/14V AC for LED and halogen landscape lighting. A detachable and replaceable photocell sensor with a 6-foot sensor cord ensures easy installation and flexible outdoor lighting

[Built-in Dusk to Dawn Sensor] Landscape lighting that is connected to this transformer will automatically switch on at dusk and off at dawn. By converting household voltage from 120V AC to 12V AC safety voltage using 120W, a safer and more useful electrical current level is produced. Tip: Do not use with a dimmer switch.

[Dusk to Dawn Sensor] Connected to this dusk till dawn transformer, the landscape lighting will turn on automatically at dusk and off at dawn; 60W, convert 120V AC household voltage to 12V DC safety voltage, providing a safer and more practical electrical current level, don't worry about forgetting the switch, energy saving(Please note the transforemr not for Halogen light)