The Correct Way to Install Decking Boards
You’ll install decking boards correctly by preparing joists at 16-inch intervals and marking crown sides for consistent orientation. Select materials based on your climate—pressure-treated wood, composite, or hardwoods—and allow proper acclimation. Use two screws per joist, positioned one inch from board edges, maintaining uniform gaps with a 16D nail spacer. Run boards perpendicular to joists for structural integrity. Pre-drill pilot holes to prevent splitting and follow manufacturer spacing guidelines. Proper board orientation, with the best face upward, facilitates both durability and aesthetic appeal while accommodating natural wood movement. The specific techniques for each phase require careful attention.
Preparing Your Joists for Board Installation
Before you lay a single decking board, you’ll need to prepare your joists with careful planning and precise installation. Start by marking joist locations at 16 inches on-center, snapping chalk lines for accuracy. Cut all joists to uniform length before installation, then seal cut ends immediately with wood treatment or joist tape for moisture protection. Mark the crown side of each joist with an X to guarantee consistent orientation. Install metal brackets aligned to your layout marks, then slide joists into place, shaving edges slightly if necessary for tight fits. Use lag screws and washers at ledger connections. Check joists for levelness with a bubble level, planing down high spots and treating exposed surfaces. Verify joists are straight and properly supported before proceeding to decking installation. For your substructure, pressure-treated lumber is often recommended to protect against moisture and decay over time. Once your deck is installed, selecting the right stain finish—such as oil-based or water-based stains—will further protect your wood investment and enhance its appearance for years to come.
Selecting and Handling Decking Materials
Once your joists are level, straight, and properly secured, you’ll turn your attention to selecting the right decking material for your project. You’ll find pressure-treated wood offers affordability, while composite and PVC provide superior moisture resistance—ideal for humid climates. Hardwoods deliver natural beauty but demand regular maintenance. Pressure-treated boards are typically protected with water-based preservatives such as ACQ or Copper Azole to guard against rot and insect damage.
Before installation, you’ll store boards flat under cover to prevent warping and moisture absorption. Allow your decking materials to acclimate to ambient temperature and humidity for several days; this reduces dimensional changes after installation. Proper acclimation prevents the warping and splitting that can occur when boards adjust to expected moisture conditions after they’ve been fastened in place. You’ll inspect each board for splits, knots, excessive warping, or decay, discarding damaged ones to maintain structural integrity. Use appropriate saw blades and drill bits rated for your chosen material to minimize splintering and damage during preparation.

Quantity and Spacing Set: deck spacers in a 20 piece orange set give you enough coverage to place several guides across a work area at once; With common spacing options including deck spacers 1/16", 1/8", 3/16" and 1/4" settings, these deck board spacers help reduce stop and start trips for a smoother layout process

Deck spacer:Deck spacer tool ensures even gaps and consistent alignment between boards. Adequate gaps help promote effective drainage and debris removal, accommodate board expansion and contraction, and prevent dents and scratches in hardwood and synthetic deck boards.

Universal Sizes: 1/16", 1/8", 3/16", and 1/4". These deck board spacers provide precise spacing control for your decking project, eliminating manual measurement errors and ensuring consistent spaces between boards
Mastering Hidden Fastener Techniques
Hidden fastener systems offer you a clean, professional appearance by concealing all fasteners beneath your deck’s surface. You’ll slide fasteners into grooved board edges and position them at joist centers for maximum hold. Stainless steel options provide superior durability and environmental resistance.
Common installation mistakes include over-tightening screws before positioning the next board, which compromises the connection. You must avoid skipping pilot holes in hardwoods, risking splits that weaken your deck’s structural integrity. Maintaining consistent gaps between boards using manufacturer-specific spacing guidelines prevents buckling and ensures long-term performance.
The hidden fastener benefits extend beyond aesthetics—you gain superior weather resistance and cleaner maintenance since exposed fasteners don’t collect debris or corrode. For ideal results, use universal fastener tools to guarantee consistent placement and proper spacing throughout your installation, guaranteeing a professional-quality deck. Systems like TigerClaw TC-G Clips are specifically engineered for grooved decking boards to ensure secure attachments remain invisible while promoting even board spacing.
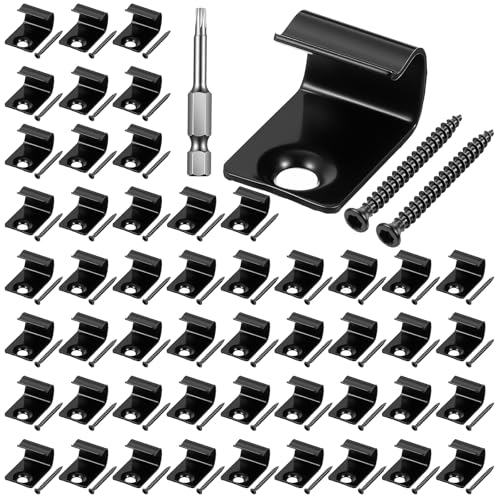
Durable Stainless Steel Material: Starter deck clips are constructed from high-quality 304 stainless steel, which offers strong resistance to corrosion and rust. This ensures the clips maintain their integrity and appearance even under prolonged outdoor exposure. The robust material provides reliable fastening and long-term performance, making these hidden fasteners suitable for various weather conditions and contributing to the durability of your deck structure.

Exclusively for use with TimberTech decking
Achieving Proper Board Spacing and Alignment
While hidden fasteners keep your deck looking pristine, you’ll need precise board spacing and alignment to verify your decking performs properly over time. Use a 16D nail as a consistent spacer between boards—it’s approximately 3/16″ thick and guarantees uniform gaps. Establish a straight chalk line on your joists before installing the first board, then align each subsequent board to this reference. Check alignment after every few boards to prevent drift. Measure gaps at multiple points along each board to maintain consistency across your deck. These spacing techniques and alignment strategies accommodate natural wood movement, preventing buckling, warping, and warranty issues. Proper post spacing and structural support are equally critical to ensure your deck can withstand lateral force requirements and maintain its integrity over time. Your decking boards should run perpendicular to pressure-treated joists that meet minimum sizing specifications to properly support the deck load. Always consult manufacturer guidelines for your specific decking material.
Installing Starter and Edge Boards
Before you install field decking boards, you’ll need to establish a solid foundation by properly installing starter and edge boards. Start by positioning starter clips 1/4 inch from the deck frame edge, aligned with joists and spaced no more than 16 inches apart. Secure each clip with a single perpendicular screw, avoiding overdriving. Use a chalk line to guide starter clip alignment along the frame. Angle your first board slightly to seat it fully into the clips, then screw down firmly.
For edge board cutting, cut fascia boards square and install them flush with the rim joist. Use manufacturer-recommended spacers to maintain consistent gaps for expansion. Pre-drill pilot holes to prevent splitting, then attach with color-matched composite screws. Keep screw heads flush or slightly recessed. Choosing stainless steel fasteners will enhance durability and prevent corrosion that could compromise your deck’s structural integrity. Finally, inspect all fasteners before proceeding with field board installation, ensuring your deck meets minimum height and safety requirements for guardrails and railings.

Defeat Rust for Good with 304 Stainless Steel - Tired of rusty screws ruining your project's look and strength? Get screws that stand the test of time. Crafted from premium 304 stainless steel, these construction screws resist corrosion in wet, coastal, and high-moisture environments, delivering lasting performance where ordinary screws fail.
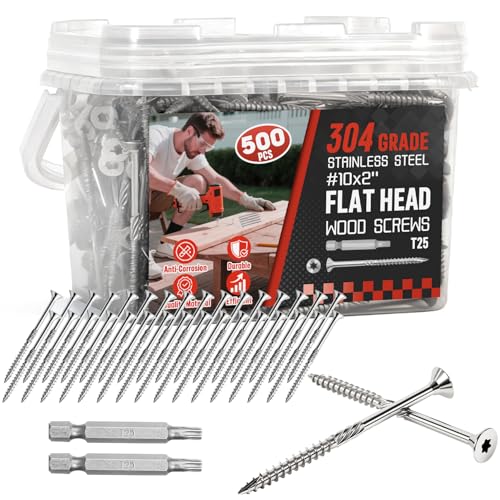
Defeat Rust for Good with 304 Stainless Steel - Tired of rusty screws ruining your project's look and strength? Get screws that stand the test of time. Crafted from premium 304 stainless steel, these construction screws resist corrosion in wet, coastal, and high-moisture environments, delivering lasting performance where ordinary screws fail.
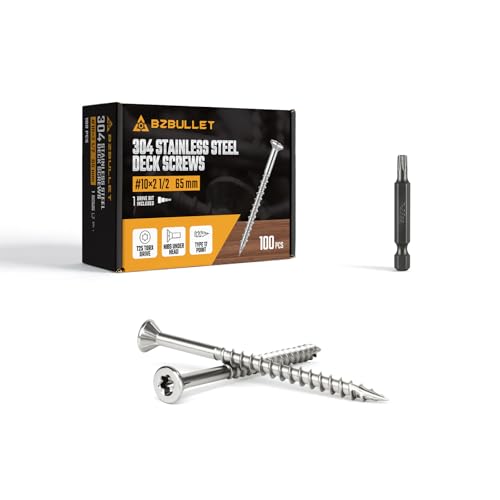
Ultimate Rust Protection - Marine-Grade 304 Stainless Steel Crafted from genuine Marine-Grade 304 Stainless Steel, our deck screws deliver unmatched rust and corrosion resistance. This makes them the ideal choice for coastal homes, docks, and all high-humidity environments. As the perfect stainless steel wood screws, they ensure your outdoor projects remain secure, durable, and aesthetically pleasing for years to come.
Fastening Boards Securely to the Frame
Once you’ve installed your starter and edge boards, you’ll need to secure your field decking boards with the proper fasteners and techniques. Select fastener types based on your decking material—composite boards require TOPLoc #8 x 2½” deck screws, while color-matched or hidden fastener systems minimize visibility. Maintain spacing intervals of two fasteners every 16 inches along each board length for ideal support. Position fasteners approximately 1 inch from board edges to prevent splitting. Pre-drill all screw holes before installation to protect composite materials from damage. Work methodically from one end to the other in a single pass. Tighten fasteners securely without over-torquing, which compromises composite integrity and causes permanent damage. Proper board spacing also contributes to water drainage and ventilation beneath your deck, protecting the structural integrity of your framing system. Similar to pergola roof installation, secure fastening of all components ensures your decking structure remains stable and durable for years to come.

30 PERCENT FASTER INSTALLATION TIME VERSUS COMPETITION: Power Pro Premium Exterior Trim Screws are engineered to complete fastening projects faster, delivering up to 30 percent faster installation time compared to leading competitive trim screws for improved jobsite efficiency.

BUILT FOR COMPOSITE DECKING: These composite deck screws fasten composite and wood decking securely, with a dual-thread design that pulls boards tight and eliminates the plastic fiber mushrooming common with composite boards.

Premium Alloy Steel: Crafted from high-quality alloy steel, these wood screws are specially engineered to withstand the elements, ensuring durability for outdoor use with ACQ-treated lumber.
Managing Board Orientation and Positioning
Proper board orientation and positioning directly impact both the structural performance and aesthetic appeal of your deck. You’ll want to position your board’s best face upward, regardless of crown orientation. While grain direction doesn’t determine the correct installation method, you should inspect boards under varying lighting angles before fastening to prevent post-installation disappointment.
Always run decking boards perpendicular to your joists for structural integrity. If your original deck requires replacement, maintain the same direction as the existing installation. For new construction, you can adjust joist orientation to achieve your preferred board direction.
Consult manufacturer instructions for grooved or smooth surface specifications. Following manufacturer recommendations for fastening will ensure your boards are properly secured and accommodate natural expansion and contraction. To prevent splitting and maintain stability, place two screws per joist approximately an inch from each board edge. Ultimately, prioritize the best-looking surface while ensuring adequate ventilation underneath for moisture control and minimal rot risk.
Essential Tools and Safety Practices
Installing decking boards efficiently and safely requires you to assemble the right combination of hand tools, power tools, and safety equipment before you begin work. Organize your tools strategically on-site to minimize movement and fatigue. Keep hand tools like shovels, pry bars, and wrenches within arm’s reach. Position power drills, impact drivers, and circular saws on stable surfaces at waist height to reduce strain.
Prioritize ergonomic practices by maintaining proper posture during repetitive fastening tasks. Use impact drivers instead of manual wrenches to decrease physical exertion. Always wear hard hats, safety glasses, work gloves, and steel-toed boots. Don’t neglect hearing protection during prolonged power tool use. Consider applying water-resistant materials to your decking to protect against moisture damage and extend the lifespan of your installation. For secure fastening, pre-drill near board ends and use two screws per joist to prevent splitting and ensure structural integrity. Proper tool organization and ergonomic awareness prevent injuries while maintaining installation pace and quality.

4-INCH EXTRA LONG REACH: Specially designed 4-inch length provides the extended clearance needed to seamlessly pass through hidden deck jigs, delivering maximum torque and optimal head engagement without tool obstruction

50-Piece T30 Bit Pack – Have one T30 size ready for repeated fastening work without searching through mixed bit sets. The 2-inch length suits deck boards, wood framing, plywood subfloor, outdoor structures, equipment panels, and garage projects

10-PACK T30 SCREWDRIVER BITS — Includes ten 2-inch T30 Torx bits for matching standard solid Torx screws. Made for users who need spare T30 bits for repeated repair, assembly, or workshop tasks