

Proper Spacing for Trex Deck Boards: A DIY Guide
You’ll maintain a 3/16-inch width-to-width gap in typical conditions, adjusting to 3/8 inch in cooler climates below 40°F. Install 1/8-inch end-to-end gaps at 40°F or higher, increasing to 3/16 inch in colder temperatures. Space joists 16 inches on-center for standard 2×8 joists, or 12 inches for diagonal layouts. Use exterior-grade fasteners and leave them slightly loose to allow board movement. Proper spacing prevents warping, splitting, and buckling while protecting your deck’s longevity and structural integrity—but there’s much more to mastering flawless installation.
Understanding Width-to-Width Gaps
When you’re installing Trex decking, you’ll need to account for width-to-width gaps—the spaces between adjacent boards running perpendicular to your joists. These gaps serve critical functions: they allow thermal expansion and contraction while maintaining structural integrity.
Your standard gap should measure 3/16 inch (5 mm) in typical conditions. However, you’ll need seasonal adjustments based on installation temperature. In cooler climates below 40°F, increase gaps to 3/8 inch (10 mm) to accommodate board contraction. Warmer installations allow smaller gaps due to board expansion.
Use reliable gap measurement tools—spacers or gauges—to guarantee consistency throughout installation. Proper spacing is critical to ensure adequate drainage and airflow, which prevents moisture accumulation and extends deck longevity. Consistent fastener spacing across joists, typically not exceeding 16 inches on center, also supports the structural integrity of your installation. Never exceed 1/2 inch maximum gap width, as wider spacing compromises aesthetics and structural performance. Maintaining uniform gaps prevents buckling under load and supports even stress distribution across your deck.

Efficient Design: This deck hidden fastener tool compatible with Trex hidden fasteners, Installing the hidden fasteners have become more convenient and efficient. A must have and value for money tool that simplifies the installation process and greatly improves deck installation efficiency, installing decks like a pro

Deck Spacers: You will receive 6 orange deck spacers. Their vibrant color makes them easy to identify during installation, and the clear size markings on the surface ensure smooth installation of new decking boards.

▼ 500-Pack. ▼ Black stainless steel screws (Hardness class #12.9 + Dacromet black coating) are included. Saving time and money. ▼ Made of anti-UV engineering Nylon plastic. No corrosion. ▼ Includes 1 Square Driver Bit: Size 0.09" x 0.09" (2.3mm x 2.3mm); Hex size 1/4".
End-to-End Gaps Based on Temperature Ranges
While width-to-width gaps address lateral spacing between boards, end-to-end gaps handle longitudinal movement along your deck’s length. Composite boards expand and contract considerably along their length due to temperature effects, making proper gap measurement critical.
You’ll install a 1/8-inch gap when temperatures reach 40°F or higher. Below 40°F, you’ll increase this to 3/16-inch to accommodate board shrinkage in cold conditions. The installation temperature determines which specification applies—measure your ambient conditions at the moment you begin fastening.
This temperature-based approach prevents boards from contacting each other during expansion cycles, which causes fastener loosening and warping. Proper spacing also works in conjunction with UV protection and moisture control to prevent the wood fiber breakdown and swelling that accelerate warping over time. Similar to how pergolas require precise measurement and assembly techniques for structural integrity, deck installations demand exact spacing calculations to ensure durability. For locations experiencing extreme temperature swings or high altitudes, follow the larger gap specification regardless of current conditions. Adhering to these gap measurements protects your warranty coverage and guarantees long-term deck performance.
Proper Spacing Around Solid Objects
As your composite decking meets walls, posts, or other fixed structures, you’ll need to maintain gaps that accommodate the material’s natural expansion and contraction cycles. Use a 1/4 inch to 1/2 inch gap depending on your installation temperature and regional climate patterns. Warmer conditions warrant larger gaps to prevent compression, while cooler temperatures allow slightly smaller spacing.
Employ installation techniques like spacer tools and string lines to guarantee consistent measurements throughout your project. Mark gap locations before fastening to maintain uniformity. Pre-drill holes near structural elements to prevent splitting. When securing boards to joists, color-matched composite screws should be driven at a 90-degree angle for optimal stability. The underlying pressure-treated lumber in your deck’s substructure also requires proper spacing considerations to prevent moisture-related expansion and contraction issues.
Make weather adjustments based on seasonal temperature fluctuations in your area. Proper spacing prevents warping, lifting, and fastener stress while extending your deck’s lifespan and maintaining structural integrity through multiple expansion cycles.

Precision in Your Project: our 24 packs of deck spacers come in about 1/8'' (3 mm) in orange, ensuring precise alignment for your decking project; With these dimensioned spacers, achieve uniform and professional spacing

Deck spacer:Deck spacer tool ensures even gaps and consistent alignment between boards. Adequate gaps help promote effective drainage and debris removal, accommodate board expansion and contraction, and prevent dents and scratches in hardwood and synthetic deck boards.

Functionality: the deck spacers feature either 1/8" or 3/16" shim edges; It spaces deck lumber apart to allow for adequate expansion and contraction to minimize guesswork; The efficient design of this decking tool ensure not only a visually appealing finish but also a solid foundation, elevating the quality and durability of your decking endeavors
Joist Spacing Guidelines for Composite Decking
Proper joist spacing is fundamental to your composite deck’s structural performance and longevity. You’ll choose spacing based on joist material durability and load capacity analysis. For straight decking with standard residential loads, 16-inch on-center spacing works with 2×8 joists spanning up to 12 feet. If you’re installing diagonal boards at 45-degree angles, you’ll need tighter 12-inch spacing. Heavy applications like hot tubs demand 2×10 or 2×12 joists with engineered consideration. In hot climates, closer spacing prevents thermal expansion-related sagging. Treated wood joists offer superior durability in moisture-prone environments. You must maintain consistent joist alignment using string lines and blocking between joists increases rigidity. Proper framing for drainage and ventilation is essential to extend your deck’s lifespan by preventing moisture damage. This precision prevents composite board twisting and guarantees your deck withstands seasonal stress effectively.

【5-Size Deck Spacers & 20-Pack】This listing: Mix-Size set. Quantity: 20 spacers per box, with 5 sizes (4 of each size). Ideal for long spans decking.▼Included Color & Size: Red: 1/8" (3.2mm) spacing, Orange: 5/32" (4mm), Yellow: 13/64" (5.2mm), Green: 1/4" (6.4mm), Blue: 5/16" (8mm).
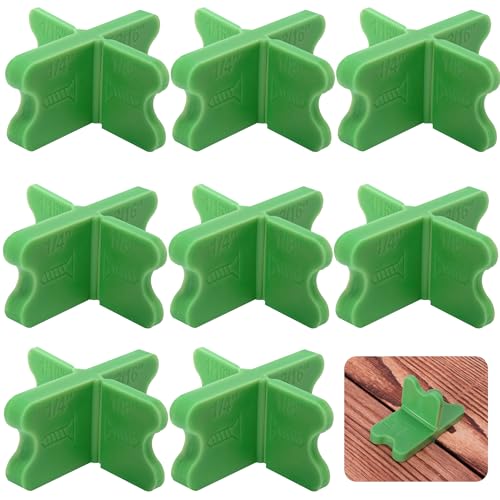
Deck spacer:Deck spacer tool ensures even gaps and consistent alignment between boards. Adequate gaps help promote effective drainage and debris removal, accommodate board expansion and contraction, and prevent dents and scratches in hardwood and synthetic deck boards.

Secure and Durable: Made from quality plastic material, these spacer rings securely hold the deck boards in place, preventing movement and warping over time. 12 Pack.
Installation Considerations for High-Moisture Environments
Since moisture presents unique challenges for deck substructures even though composite boards resist water absorption, you’ll need to implement protective measures that extend your deck’s lifespan. In high-moisture environments, apply flashing tape over your joists to shield the wood substructure from water damage and expansion issues.
Adjust your board spacing to 3/8 inches for moisture management and airflow improvement, allowing debris and water to pass through more effectively. This wider gap prevents moisture buildup and reduces mold and mildew risks on both boards and substructure. Treated wood joists should be selected based on ground-contact treatment grades to ensure your substructure withstands prolonged moisture exposure.
Ground-level or shaded decks particularly benefit from enhanced spacing for faster drying. Regular maintenance—cleaning with soft brushes and pressure washers—keeps drainage pathways clear and prevents biofilm formation that feeds fungal growth. Using a quality wood cleaner designed for high-moisture environments provides additional protection against mold and mildew colonization.
Best Practices for Professional Results
Achieving a professional-quality Trex deck requires attention to three critical elements: fastening systems, spacing precision, and installation technique. You’ll want to select hidden fastening systems like Trex Hideaway or CAMO EDGE clips rather than face screwing, which leaves visible screw heads and diminishes aesthetic appeal.
Invest in specialized installation tools—power drills with composite-specific bits, impact drivers, and the Trex Hideaway One-Step Hidden Fastener Tool—to guarantee consistent, error-free fastening. Pre-drill pilot holes to prevent board splitting and secure proper screw seating. Following manufacturer-specific spacing requirements ensures your deck maintains proper expansion and contraction throughout seasonal changes. Hidden fasteners are slid into the grooves between deck boards and attached to the joists with screws, initially left slightly loose to allow positioning of the next board.
Maintain 3/16-inch spacing between boards using plastic spacers and chalk lines for uniform alignment. Mix board colors before installation to avoid streaking. Secure your first two edge boards carefully since they establish the spacing template for your entire deck, guaranteeing all subsequent boards align perfectly. The system ensures a seamless, polished look without visible screws, reduces the risk of board splitting, and creates uniform spacing for enhanced deck durability and aesthetics.
Common Mistakes to Avoid During Installation
Even with meticulous planning, installation errors can undermine your deck’s structural integrity and longevity. Your fastening techniques must follow manufacturer specifications precisely—over-tightening compresses boards and restricts natural expansion, while incorrect fastener types void warranties. Pre-drill oversized holes (5mm recommended) for trim boards to allow proper movement.
Don’t skip critical spacing elements. Ignoring expansion gaps at board ends, butt joints, and structure perimeters causes warping, splitting, and buckling. Adjust gap sizes based on installation temperature for proper long-term fit. Just as railing balusters require proper spacing guidelines to meet safety codes, your deck boards need consistent gaps to function correctly.
Verify joist spacing meets requirements: 16 inches maximum for standard installations, 12 inches for diagonal layouts. Neglecting joist tape exposes framing to moisture damage. Ensure all exterior-grade fasteners are corrosion-resistant to prevent rust staining and structural compromise.
Finally, acclimatize boards to ambient conditions before installation and mix packs to prevent color banding. Regular inspections catch small errors before they compound into structural problems.


